So, you’ve braved the pre-order sites, or maybe you’ve just gotten lucky while waiting in line—either way, you’ve got yourself a Nintendo Switch 2. Congratulations! But before you start gaming, there are a few things you’ll need to keep in mind while setting up your console. Nintendo is known for being user friendly, but also a bit particular. Case in point: You can only do a full transfer of your Switch 1 data to your Switch 2 during setup, and if you miss this opportunity, you’ll have to reset your device to try again, or manually copy over your games and save data piece-by-piece later on.
Luckily, I’ve got your back. Read on for a quick guide on how to set up your Nintendo Switch 2, and the three other features you should set up before you start playing.
How to start setting up a Nintendo Switch 2
For the most part, setting up a new Switch 2 out of the box is straightforward, but you’ll still want to pay close attention to each step before moving on, especially when it comes to transferring console data.
First, remove your Switch 2 and your joy-con controllers from their packaging. Then, plug your joy-cons into their respective slots (they’ll attach magnetically, so it’s much simpler than on the first Switch). If you don’t know which joy-con goes where, the one with red highlights goes to the right of the screen, and the one with blue highlights goes to the left.
Next, plug your Switch into power using the included charging brick and cable, and power it on. On the screens that follow, select your language and region, then read and accept the end-user license agreement.
Credit: Michelle Ehrhardt
You’ll see a screen to connect to the internet and download the console’s day-one system update. This technically isn’t mandatory, and skipping it (with the X button on the right joy-con) will instead take you to time zone settings. However, most features will be locked down, including backward compatibility, until you download it, so I recommend doing it during setup if possible. If you do skip this step, you can access the update later under Settings > System > System Update.
Once you’re connected to the internet and you’ve started downloading the update, you’ll be able to continue setup while it downloads. Now, you’ll pick your time zone and click through a couple of tutorial pages. These will instruct you about portable and TV play, tell you how to use the kickstand and extra USB-C port, and walk you through detaching your joy-con from the console (press in the button on the back of the joy-con, underneath the trigger, and pull). You can also click through an optional tutorial on connecting your Switch 2 to a TV, if you like, after which you’ll get quick guides on using the included joy-con grip accessory and the joy-con wrist straps.
If your console hasn’t finished updating, it’ll finish that now, and then take you to your first big decision: do you want to transfer your Switch 1 data to your Switch 2?
Transferring Switch 1 data to the Switch 2
During Switch 2 setup, Nintendo will allow you to transfer your Switch 1 data to your Switch 2, but there are a few caveats.
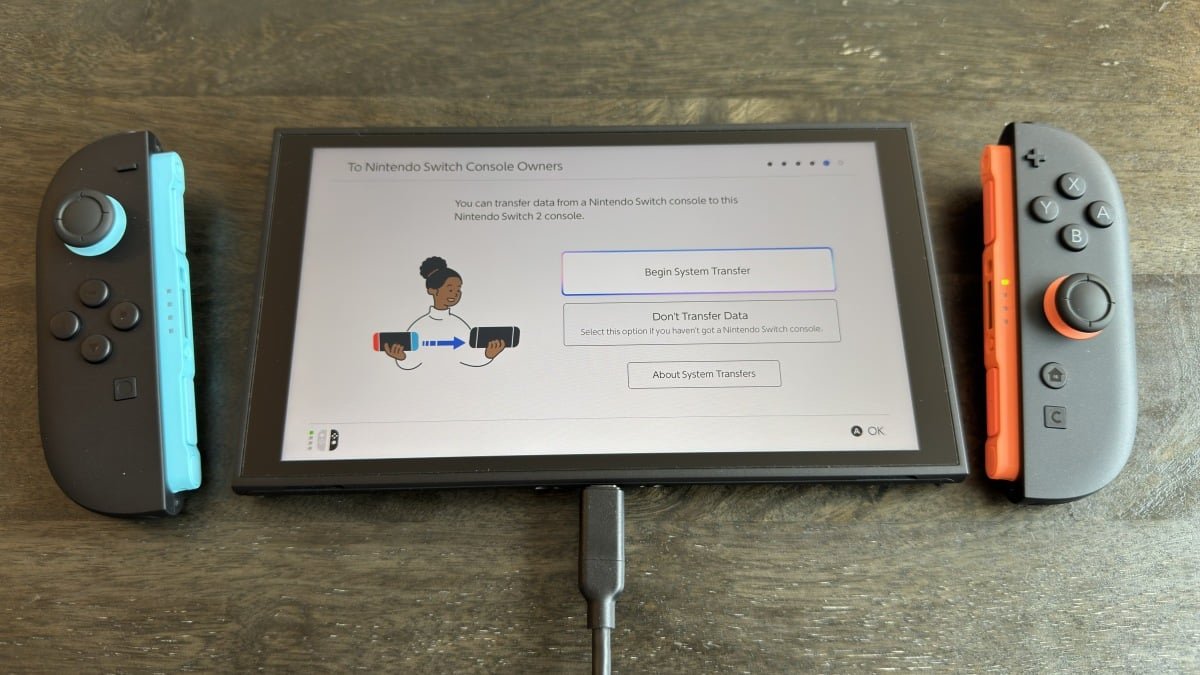
You’ll know you’re ready for this once your system update is downloaded and you’re on a screen that says “To Nintendo Switch Console Owners,” above a graphic of someone holding a Switch 1 and Switch 2.
Next to the graphic, you’ll see two buttons: Begin System Transfer, Don’t Transfer Data, plus a third button below that explains the process to you, but leaves out a few key details.
Before you make your decision, the most important thing to remember is this: There are actually two ways to transfer data from the Switch 1 to the Switch 2, and despite what you might have read elsewhere, locally transferring your Switch 1 data to the Switch 2 during setup will not factory reset your original Switch. Unless you’ve taken extra steps beforehand, this is the option Nintendo’s setup process will recommend to you, so most users don’t need to be scared about accidentally erasing their original consoles.

Credit: Michelle Ehrhardt
If you stick with a local transfer, it will simply copy over your data to your Switch 2, so that it exists on both systems. There are a few specific cases where some data will get removed from your original device as it makes its way over to your new one, but for the most part, you’ll be able to keep using your original device as usual after the transfer, and there are ways to get that data back later on (I’ll get into that). Just know that save data for specific games, as well as some free-to-play games, may have been deleted from your Switch 1 and moved over to your Switch 2. Don’t worry— Nintendo will warn you about which software will be affected during the transfer process. Additionally, screenshots and video captures stored on a microSD card attached to the Switch 1 will need to be moved over manually later on.
How to transfer your Switch 1 data locally
With that in mind, if you want to transfer your data locally, which is what most people should do, click the Begin System Transfer button and follow the instructions—this involves signing into your Nintendo account, keeping your original Switch powered on and in close proximity to the Switch 2, and activating the transfer on your original Switch under Settings > System Settings > System Transfer to Nintendo Switch 2.
How to transfer your Switch 1 data using Nintendo’s servers
The confusion about factory resets comes from this data transfer option, which involves using the Nintendo servers. This will factory reset your Switch, and is best if you plan to sell it anyway, or if you expect to be away from your original Switch during Switch 2 setup and don’t mind setting up your original console from scratch when you get back to it. To start this kind of transfer, power on your original Switch, navigate to the System Transfer page mentioned above, then select I don’t have a Nintendo Switch 2 yet. Take note of the Download Deadline for later. Conveniently, that does point to one upside to this method: you can start it before you even have a Switch 2 in hand.
Now, click Next, then Upload Data, then OK, followed by another OK. Click Start Initialization to begin factory resetting your original Switch.
From here, your original Switch will revert to how it was before you bought it, and you’ll need to move over to your Switch 2, click Begin System Transfer, and sign into your Nintendo account. If the system detects that you have transfer data to download from the cloud, it’ll walk you through the process. Note, however, that if you don’t download your transfer data before the deadline you jotted down earlier, you’ll lose access to it.
If you want to skip the data transfer process…
If you’d rather not transfer your data, that’s also fine, but you won’t have an opportunity to do so later, and will instead need to move games and save data over manually. Click the Don’t Transfer Data button, then Continue to move to the next step.
Adding a user and parental controls
With system transfers out of the way, you’re through the hardest part of setting up your new console. Now, you’ll be prompted to add a user to the system. Here, you can sign in with your Nintendo Account to get access to your Switch Online subscription and your collection of downloadable games, or create a local user profile. After that, you can add more users as you like, or you can save that for later (simply navigate to System Settings > User > Add User).
Next up, parental controls. Like with additional users, you can set these up later under System Settings > Parental Controls, but there’s no harm to setting them up now as well. To do so, click Set Parental Controls.

Credit: Michelle Ehrhardt
You’ll have a few options. Most of these will prompt you to use Nintendo’s Parental Controls app, but you can also click the X button on the right-hand joy-con to set up limited parental controls directly on the console. Doing so will allow you to select from a number of presets that will block access to certain games and communication features, but not much else. Using the app, meanwhile, will let you set a daily play time limit, bedtime settings, restrictions on the new GameChat feature, and see reports on play time and games played. It also doesn’t require a Switch Online subscription, so it’s worth using if you have a smart device.
To set up parental controls using the app, first download it for either iOS or Android using the information on the screen, then click the “If You’ve Already Downloaded the App” button. Enter the registration code from your app into your Switch 2 system, then follow the instructions in the app to finish setup. Which buttons you’ll need to click will depend on the controls you’d like to activate, as well as for which users and systems, but it’s fairly straightforward.
MicroSD card limitations
Just a couple more screens. First, a quick warning about microSD cards. Unlike the Switch 1, the Switch 2 is only compatible with microSD Express cards, which are faster, but options for them are also a bit more limited—in other words, there’s a good chance you won’t be able to use the same microSD card from your Switch 1 on your Switch 2. To use a microSD card on Switch 2, it’ll need either of the two logos shown in the image below. A bit of a bummer, but at least a microSD card is optional (it’ll help you store more games, but the included storage on the Switch 2 is more generous than on the Switch 1).

Credit: Michelle Ehrhardt
Oh, and like on the Switch 1, the microSD slot is hidden under the kickstand, in case you’re having trouble finding it.
Virtual Game Cards
You’re technically through setup at this point, but there are still a few features you’ll probably want to configure before you start gaming. The most obvious of these is Virtual Game Cards, Nintendo’s new system for managing games purchased digitally.
What do you think so far?
Essentially, like the name implies, these work similarly to physical game cards, but over the internet. This means that, unlike with your Steam library, you can only load a game to one console at a time. “Loading” is Nintendo specific term, but for the most part, it just means your game is downloaded and ready to play.”(Technically, you can still play the same game on two separate consoles at the same time, even if it isn’t loaded on one, but doing so is a bit obtuse—click through here for more details.)
To access your Virtual Game Cards, click the Virtual Game Card icon in the bottom row on your Switch 2’s home screen—it’ll look like a game cartridge. From here, if you’ve signed into your Nintendo account, you’ll see all your digital purchases and will be able to download and play them from here. If you haven’t signed into your Nintendo Account, you’ll have the option to do so.

Credit: Michelle Ehrhardt
Now, you’ll have a few options. First, if a game isn’t loaded onto your original Switch, you can simply download it to your Switch 2 by clicking Load to This Console. If the console isn’t set as your primary device (likely the case if you didn’t do a transfer), you might see a warning if you try to open a game, depending on how up-to-date your original Switch’s software is. If your original Switch doesn’t have the Virtual Game Cards update yet, you can click the If You Don’t Have That Console button to download your game anyway. It will simply cease being playable on the other console while you use it on this one, although that’s always the case when moving a Virtual Game Card between systems.
Otherwise, you might need to link your two systems by bringing them close together and following the instructions on screen before you can load a Virtual Game Card on your new device. If you’re not able to do this, like if you’ve gotten rid of your original Switch while it’s still set as your primary device, you can remove your old Switch from your account by deregistering it. After deregistering your old console, you can set your Switch 2 as your new primary device by connecting it to the eShop. If you’re able to link your old console to your new one, this won’t be necessary for simply accessing your library, but it will extend any Nintendo Online benefits to all users on your new primary device, rather than the one associated with your Nintendo Account.

Credit: Michelle Ehrhardt
Alternatively, if you’ve managed to link your devices, you can use the device that currently has your Virtual Game Card (i.e. your Switch 1) on it to load it to your new one (i.e. your Switch 2). Simply open your games, click Load to Another Console, and follow the instructions on screen. This will have the same effect as the Load to This Console Button. Also, if you’d like to be able to continue playing a game on a device even after moving its Virtual Game Card to another device, you can enable Use Online License under System Settings > User Settings > Online License Settings to do just that. You’ll need to be connected to the internet for this to work, whereas you can play a Virtual Game Card offline, but it’s better than nothing. Plus, this enables that workaround from earlier in this section that allows you to play the same game on both devices at once.
How to lend a Virtual Game Card to someone else
You’ll also notice that you can lend a Virtual Game Card to members of a “Family Group.” To do this, you’ll first need to set up a Family Group online. On Nintendo’s website, log into your Nintendo Account, then click the Family Group tab on the left hand side of your account page. Here, you can invite members to join your Family Group via email, or create a Family Group account for your child. Note that if you have a Nintendo Switch online Family Plan subscription, members of your Family Group will be able to use its benefits (for up to eight accounts), although accounts that are part of your family group can also still use their individual subscriptions.
With a Family Group set up, on the Virtual Game Card page, click the game you’d like to lend out, then Lend to a Family Group Member. Next, bring your Switch 2 in close proximity with that Family Group Member’s device—this needs to be done in person.
Finally, click Select a User to Lend to. You can lend up to three games to three different accounts at once, and borrowers will be able to play these games for 14 days. During that time, you won’t be able to play the Game Card, and the borrower won’t get access to your save data while borrowing. However, they will keep their own save data for their next borrowing period, or if they choose to buy the game themselves. There are no limits to how often you can lend out a game, and you can re-lend games immediately upon the borrowing period expiring. Also, while you’ll need to lend out your games in person, they’ll return to you remotely.
Transferring save data
Even if you didn’t transfer your Switch 1 data to your Switch 2 during setup, you can still access its save data on your new device. You have a couple of options here.
First, the free option. On your original Switch, go to System Settings > Data Management > Transfer Your Save Data. Click Send Data to Another Console, then pick the user whose saves you want to send to your Switch 2. Pick the saves you want to send over, then click OK. Note that these saves will be deleted from your original console once moved over.
Next, with your Switch 2 in close proximity to your Switch 1 (this also needs to be done in person), navigate to System Settings > Data Management > Transfer Your Save Data. Click Receive Save Data.
To move data from your Switch 2 to your Switch 1, simply perform these steps in reverse.
Second, the paid option. If you have a Nintendo Switch Online membership, you can also use cloud saves to move save data between devices. By default, these are enabled automatically and will keep both of your systems up to date with the most recent saves. However, you can also manually download cloud saves either from a game’s software menu (press + or – while hovering over it on the Switch home screen) or from System Settings > Data Management > Save Data Cloud. You can also disable automatic save data download from here, if you like.
Lock your home screen behind a passcode
Finally, you can lock your Switch 2 with a PIN for some added security, kind of like a cell phone. To set this up, simply go to Settings > System > Console Lock. Click OK, then follow the instructions on the screen that pops up to enter your PIN.
There’s plenty more to dive into with the Switch 2, which I’ll cover over the following week. For now, though, this should be enough to get you started. Happy gaming!